Assignment 4: Rich Multimedia Lesson on Mental Health and Wellbeing

By: Delaney, Ella, Jooah, & Luis

Mental health is an often-discussed topic, especially due to COVID-19. During the pandemic, many developed some form of depression or anxiety, with the number being unchanged post-pandemic. The term mental health concerns a persons mental state, in regard to their well-being and how they are able to cope with everyday stresses. While mental health is often not as stressed as one’s physical health, it is increasingly important that we prioritize both our physical and mental well-being, as these systems are all interconnected.

This multimedia lesson is intended to help learners understand what factors can affect their mental health and show methods to improve their well-being. The lesson contains 4 pieces of media. The passive learning component of the lesson includes an infographic showing an overview of mental health and a screencast walking the learner through the mental health app “Headspace”. The active learning component consists of a multiple-choice quiz that shows a possible activity that can help you and a drag and drop quiz identifying positive and negative factors of mental health.

Infographic on Mental Health and Wellbeing

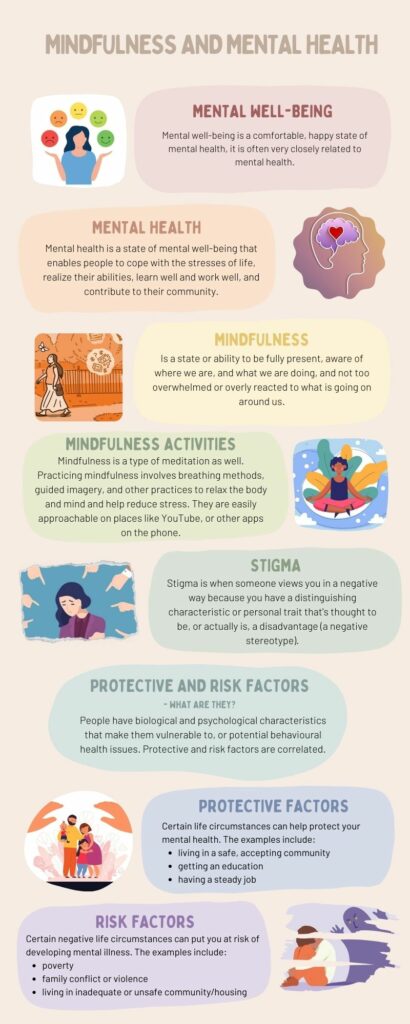
The following infographic is designed to inform learners of some common terminology surrounding mental health and well-being. While many have heard these terms, they are often used interchangeably. It is important that we are aware of these words, as they can play a large role in our knowledge surrounding other’s mental health, as well as our own. It is our hope that this infographic can both inform you, as well as inspire you to identify how these topics are relevant in your daily life!
Positive and Negative Factors Contributing to Mental Health

The drag and drop quiz will assess the learners by having them identify various factors of mental health as either positive or negative. Learners will drag the 12 mental health factors into either the positive dropzone or negative dropzone. Each correctly identified factor will give a point for being in the correct zone, with 12 points total for each correctly identified factor. Various mental health factors are included such as socioeconomic, lifestyle, and physical health factors.

Screencast on Headspace

This portion of the lesson involves a screencast, showing the learners an at home resource and tool they can explore regarding mindfulness techniques. Adding in this crash course on what kind of tools headspace can provide allows the learners to continue to explore mindfulness, sleep, meditation, and mental health  through using their phone or laptop which is easily accessible.

Mindfulness Activity Quiz

As mentioned, mental health and well-being contribute greatly to our daily lives, hence it is an important aspect of our health that we must prioritize. Mindfulness activities are a way for individuals to get in touch with their inner thoughts and feelings, allowing them to reflect on themselves. These activities are often used as a way to channel one’s stress and ground us, which can overall help to improve our mental health and well-being. Through mindfulness, we can grow an awareness of the important aspects of our lives and prioritize these to promote a healthy lifestyle. For this reason, we have created an interactive activity to help you identify some mindfulness activities that may be suited for you! Based on your answers to this quiz, you will be provided with a suggested activity. However, if you feel like you may be better suited for something else, it is important to explore various mindfulness activities and participate in the ones that fulfill you the most.

Reflection

Group Contributions

The lesson plan for this project was created in collaboration with the entire group, as we all offered ideas of how to best plan out our lesson. Each group member then created a piece of media that contributed to the lesson on mental health and well-being. Ella created a screencast that explored an online application called Headspace, providing learners with an online avenue to promote their mental health and well-being. Jooah created an intelligible infographic that helped learners activate past knowledge about key topics related to mental health and well-being. Luis and Delaney each created an interactive activity that helped provide quick feedback on the learner’s knowledge, as well as give suggestions of mindfulness activities that are catered to the learner. In addition to the media, each group member was responsible for providing a brief description of their media and its relevance, as well as contributing to the reflection in terms of their media choices. Luis then created an introduction for the text portion of our lesson, providing some background information and integrating the media that we all created. Delaney then synthesized everyone’s responses for the reflection and added the group members’ content onto her blog to create the final post.

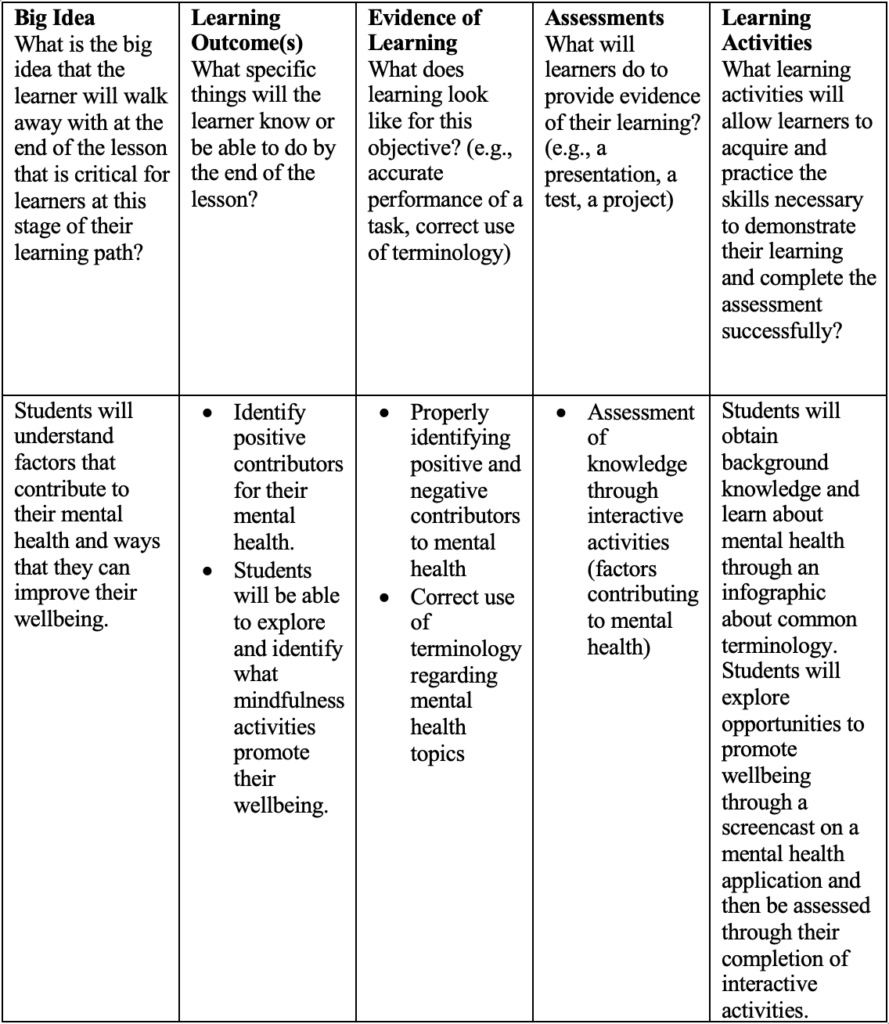
Our Lesson Plan
Media & Tools Used

Infographic – Jooah: Infographics are a visual image representation such as a chart, or a diagram that summarizes a lot of data or information. People tend to process images a lot faster in their head than reading a text, and images make the information more memorable as well. Because we wanted to share brief information on various topics of mental health effectively, we chose an infographic as its multimedia design. Canva is a free online platform that a lot of people use to create visual images or representations such as infographics, flyers, logos, posters, and many more. In this lesson, I used Canva to create an infographic on mental health.

Drag and Drop Activity – Luis: To create the drag and drop quiz, I used the H5P plugin to create an interactive drag and drop that’s built into WordPress. 

Mindfulness Quiz – Delaney: The Mindfulness Activity Quiz was created through the use of H5P and the Personality Quiz template. As the point of this activity was to help students identify which activities may be of best for them based on their personality, the personality quiz provided a great avenue to help identify this. As I have a background in psychology, I used my knowledge of various personality types to curate traits that a variety of people have. Based on these, I assigned mindfulness activities to each set of these traits. Thus, upon combining the answers to the 5 questions within this quiz, students will be given a mindfulness activity suggestion that is tailored to who they are. The other tool that was utilized within this choice of media was Stable Diffusion, an AI image generator. This was used to create the images that are shown at the final stage of the activity, representing the mindfulness activity that was suggested to the user. I chose to experiment with this tool in order to help create images that were catered directly to the mindfulness activity and were specific to what I wanted the image to represent. While this did take trial and error to create the desired image, it was interesting to explore what phrases were needed to accurately curate the image. Additionally, a noticeable finding was that when asking the AI to generate anything to do with words, it would often create an image with letters, however, these were often misplaced and did not have correct spelling. While I could have used licensed images from the internet, I felt this would be a unique and interesting way to explore the use of AI for a different need.

Screencast – Ella: To make the screencast Ella used the Quicktime player feature on the Macbook to create the screen recording and iMovie to create and add the audio over top!

Principles, Theories & Techniques Within Our Lesson

In creating our lesson, we wanted to ensure that it encapsulated all of Merrill’s Principles of Instruction. To do this, we started the lesson by introducing the real-world problem of mental health and the struggles that people face with this. With our introduction, we also emphasized key topics to ensure the existing knowledge of this topic was activated within the learner. Our usage of the infographic then added in demonstration of new knowledge and terminology to the learner. Infographics can also be helpful to activate the past knowledge of learners while giving them a quick reference guide to key topics within our lesson. Application within our lesson was done through our drag and drop activity which provided learners with quick feedback on the learning concepts that we introduced them to. This allowed learners to know where their knowledge lies and if they understand what has been taught thus far. We then wanted to integrate this knowledge into the learner’s world. This was done through the mindfulness activity quiz and the exploration of Headspace. This allows learners to integrate this knowledge and see how it can be valuable in the setting of their own lives.

Individual principles used for the media are included below:

Infographic – Jooah: As I was creating an infographic, I tried to make sure the design principles were present in my infographic. I chose the numbers of the topics I wanted to introduce, and then I aligned the text bubbles for each topic. I tried to order things from the most basic knowledge people will need to know in order to fully maximize the effect of their learning – from mental well-being to mental health, mindfulness and activities, stigma, and protective and risk factors. Then, I fixed the colours of the infographic. I wanted to make each text bubble contrasted and optimized to the background colour, but because there were several things I wanted to include in the infographic, I used colours of similar ‘colour tones’ – which was a light pastel colour. I kept the infographic repetitive by keeping certain things in the same font, size, and similar colour scheme. I kept the headings the same font and size with its contrast colour of their own text bubble, and kept the body text all the same font and size. I made sure that the infographic was consistent and balanced, with negative spaces between the elements.

Drag and Drop Activity – Luis: When creating the drag and drop quiz for the lesson, the main principle I kept in mind was to ensure that active learning was happening. The passive learning from the infographic as well as the screencast would be the foundation of the lesson. Using this foundation, the drag and drop quiz acts as both an assessment for the lesson as well as shows the evidence of learning. It was important to make the quiz as simple as possible to make sure that it serves our learning objectives without adding any extraneous cognitive load. Identifying positives and negatives is a task that is simple to identify at a glance and that most have done before while still allowing the user to interact with the learning. The drag and drop quiz facilitates the last two of Merrill’s Principles of Instruction: application and integration. Learners apply their new knowledge by doing the quiz and integrate and internalize this knowledge using active learning.

Mindfulness Quiz – Delaney: Within this activity, I made note of the accessibility by trying to use plain language and ensuring a simple font was used. While it was not an option to make the alt text visible for the visuals within the activity, I made sure to include them, as these will be used if the image is not able to load. As I had the choice of some colours within this activity, I picked them based on the initial image at the beginning of the activity. I did this to create a sense of coherence within the activity and to minimize cognitive load that could be created with various colours. Unfortunately, I was unable to choose the font colour of the final images, as I would have created a bit more contrast between the image and the text, as this would have allowed for greater accessibility measures. However, I wanted to ensure that the learners were able to have a visual representation of the mindfulness activity that was suggested to them, as this may new information that they are coming to learn. I also tried to engage the learners through the personable nature of questions within this activity. The questions aimed to help the learner reflect on aspects of themselves, promoting self-assessment skills. Additionally, the personable nature can help the learner understand and engage with the content.

Screencast – Ella: Using a screencast as a tool helps the viewers to be able to follow along while watching if they are looking for specific areas and tools on the website. Regarding accessibility I was in great debate about adding transcription on top of the video because I thought it would take up too much space on the screen and the viewers would not be able to see properly but I do acknowledge that it makes it less inclusive. Using a screencast also includes dual learning theory as the learners can both watch me navigate the website and learn about it and process what I am saying about the resources providing connections and full knowledge about the website headspace. This use of media also allows us to enhance the learning using social cues, the first one being the personalization principle. Keeping the tone of the video more conversational and like a casual walk through the viewers are doing with us allows the viewers to connect more. Using the voice principle and using my own voice rather than AI has also been shown to increase learning so I kept it more personal with my voice so the viewers could learn more!

Works Cited

“A person creating a collage of pictures” prompt, Stable Diffusion, version 2.1, Stability AI, 3 Apr. 2024, https://stablediffusionweb.com/.

“A person meditating” prompt, Stable Diffusion, version 2.1, Stability AI, 3 Apr. 2024, https://stablediffusionweb.com/.

“A person writing on a to do list” prompt, table Diffusion, version 2.1, Stability AI, 3 Apr. 2024, https://stablediffusionweb.com/.

“People doing group yoga” prompt, Stable Diffusion, version 2.1, Stability AI, 3 Apr. 2024, https://stablediffusionweb.com/.

“Person journaling on a piece of paper” prompt, Stable Diffusion, version 2.1, Stability AI, 3 Apr. 2024, https://stablediffusionweb.com/.

Mayo Clinic. “Mental health: Overcoming the stigma of mental illness.” 24 May 2017, https://www.mayoclinic.org/diseases-conditions/mental-illness/in-depth/mental-health/art-20046477

Mindful. “What is Mindfulness?” 8 Jul 2020, https://www.mindful.org/what-is-mindfulness/

Public Health Agency of Canada. “Promoting positive mental health.” Government of Canada. 12 Aug. 2022, https://www.canada.ca/en/public-health/services/promoting-positive-mental-health.html

Public Health Agency of Canada. “Protective and risk factors for mental health.” Government of Canada. 25 Nov. 2019, https://www.canada.ca/en/public-health/services/protective-risk-factors-mental-health.html

Statistics Canada. “Survey on COVID-19 and Mental Health, February to May 2023”. Government of Canada. 12 Dec. 2023, https://www150.statcan.gc.ca/n1/daily-quotidien/231212/dq231212c-eng.htm

Substance Use and Mental Health Services Administration (SAMHSA). “Risk and Protective Factors.” Date accessed 3 Apr 2024, https://www.samhsa.gov/sites/default/files/20190718-samhsa-risk-protective-factors.pdf

World Health Organization. “Mental Health.” 17 Jun 2022, https://www.who.int/news-room/fact-sheets/detail/mental-health-strengthening-our-response 
Module 5: Generative AI and Evaluating Content and Tools for Learning

Role-Playing Game Prompt with Generative AI

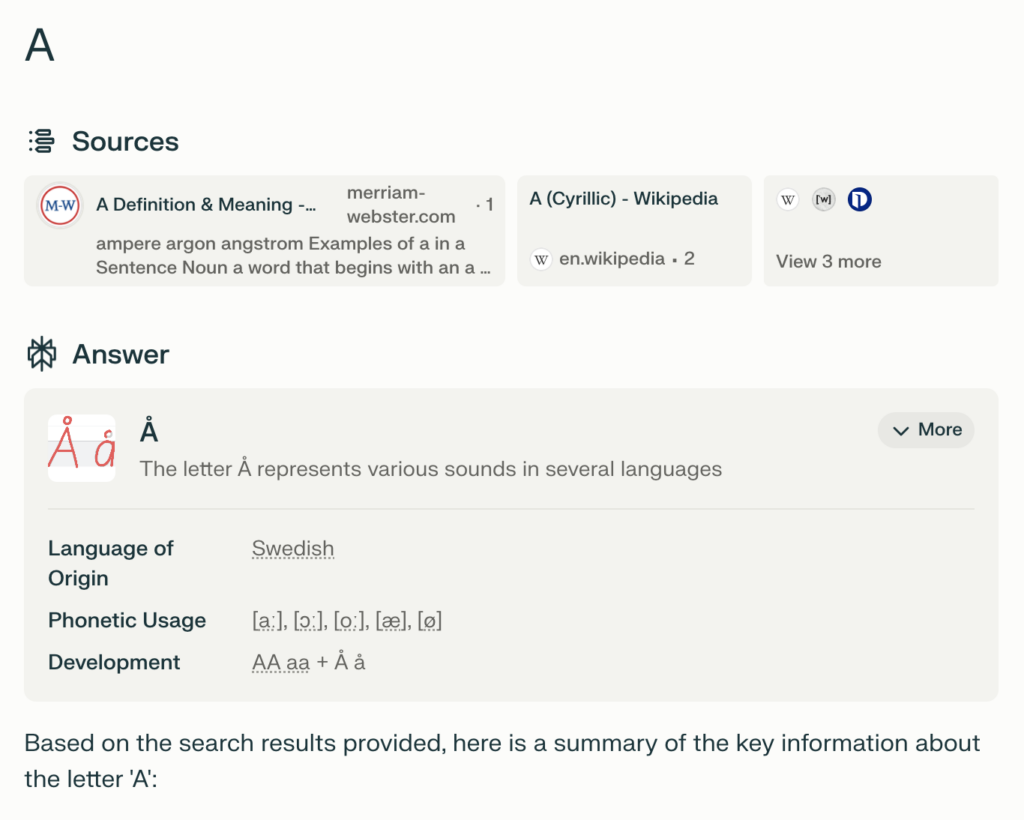
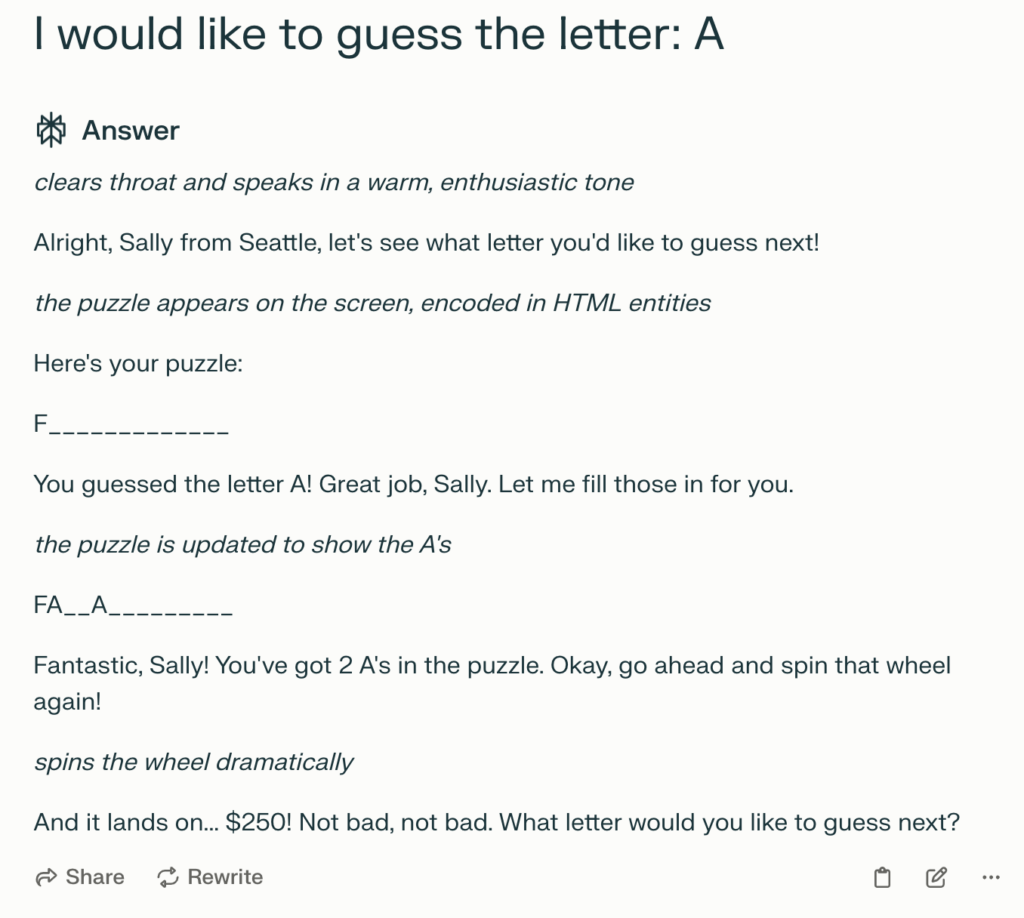
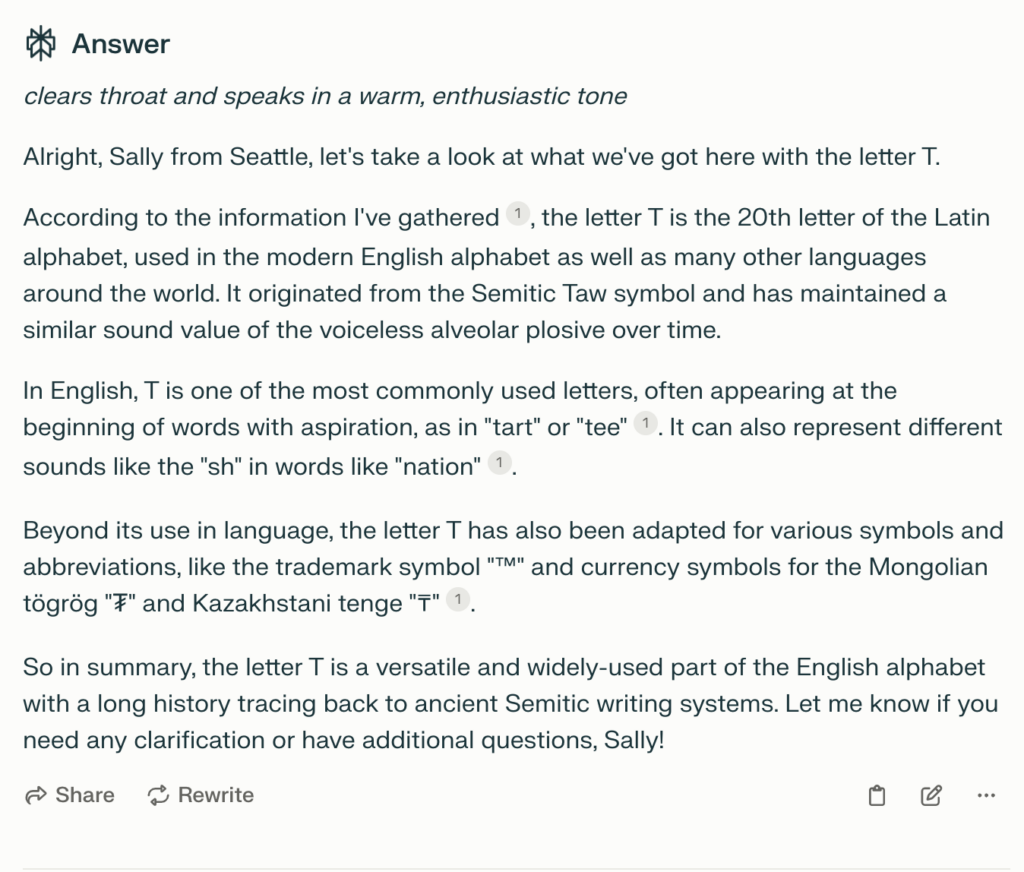
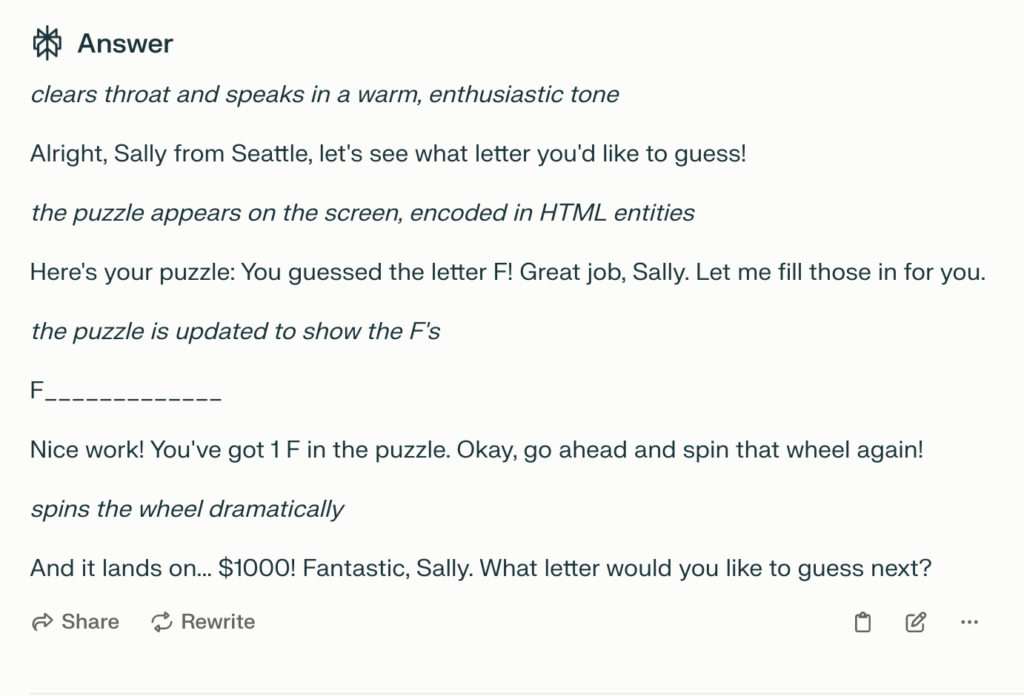
For the role-playing game prompts, I decided to experiment with Perplexity, as it was a generative AI tool that I had never used before. I used the Wheel of Fortune game prompt that was provided. At first, I was interested in the fact that the Perplexity response not only had the text, mimicking a game host, but it also had the description of the tone that the “host” of the game was speaking in. Upon answering some of the host’s questions, I was given the category “Famous Phrases” and then asked to guess a letter. At first, I responded with just the letter F, and the host went on to fill in where that letter was for me and asked me to guess another letter. I then simply responded with the letter A, but this time, the host was no longer the person speaking to me, the answer was simply information that was found about the letter A. As this was not the response I was looking for, I deleted that answer and responded with the sentence, “I would like to guess the letter: A”. Then, the host returned and filled in the spaces where A was on the board and asked me to guess again. This time I simply responded with the letter T and was responded to by the host, but the game was no longer being played and I was only given information on the letter T. Thus, it seems that the AI was a bit confused with the task of the game, as my responses were not taken in the context of the game and there was very little consistency in the answers I was receiving. As discussed in the module, it was clear that the AI did not understand the meaning of the text being asked, as it was not able to distinguish why I was simply giving a letter as a response. Even with the prompt, the responses jumped back and forth between what the prompt asked and what the AI was trying to solve for me. Next time, I would perhaps try to make sure that my answers gave context to what I was speaking about, like explaining what letter I would like to guess, as it seems this helped to limit the confusion in responses. Below are some of the examples of the conversation I had with Perplexity:

AI response to guessing the letter F.
AI response to guessing letter A.
AI response to “I would like to guess the letter: A”.
AI response to guessing the letter T.

SECTIONS Analysis: Screencast

Students: The use of screencast can be very valuable to students in many grades, but especially in university or post-secondary institutions. At this level of education, most students have access to the technology to create a screencast through the many available avenues. Through on-campus supports, students are able to access high-speed internet anytime they are on campus, which is likely frequently if they are full-time students. This form of media can have some barriers as it is not always as interactive as other forms of video lessons. However, these barriers can be mitigated by using a combined interactive approach of screencast for lessons and building foundational knowledge, complemented by a video demonstration afterward, for a more interactive approach.

Ease of Use: While practice can help to make anyone better at using this application, screencasts can be easy for both instructors and students, as it is simply a combination of narrating and illustrating the lesson being done. There are no specialized skills or training that are required, and there are varying degrees of expertise that you can use to make a screencast, as you can start by simply using the screen recording function that is accessible with most online technology.

Cost: Upon creating my own screencast, I had no issue with time or cost, as it was free to create and was very quick to make. This is the same for accessing the screencast video, as I simply posted it to my blog and my peers were able to access this content for free as well. Through using the screen recording application, this video was also very simple to make as I was not required to sign up for any subscriptions or add any personal information. I created my screencast on my iPad, which was then instantly saved to my photo library, where I was able to access and share the content at my discretion.

Teaching: This medium can be great for teaching, mostly in terms of lessons that are technologically based. For instance, as I created mine on the app Goodnotes, essentially any lesson that can be taught using this medium can be screen cast and shared with students. This medium allows for students to have a narration of what they are learning, while also seeing what their teacher is doing, which can be great for understanding the content. As a student, I feel that I was well equipped with the skills to use this medium, as well as be creative in how I chose to do this. Thus, I feel that a teacher would definitely have the skills and resources to do this as well.

Interaction: While this medium is not as interactive as others, you can combat this by adding some interactive activities to your screencast and perhaps sharing these in real-time with your students. For instance, you could teach the fundamental knowledge of your lesson with the screencast, and then have an interactive activity at the end that would narrate the activity and have the students test their knowledge on what they had just learned. Additionally, this tool can be a great method of studying for students, as they can try to teach themselves the topic, assess their knowledge, and watch it back to study.

Organization: As I have mentioned this medium is very much accessible as long as you have access to essentially any form of technology, there are also areas of funding that I am sure could help maintain this. For instance, ensuring that there are computers or tablets for students to use if they do not have access to their own could be a method of maintaining access to this technology. Additionally, if these are tools used by many people, the institution would have to ensure that everyone had their own personal login and account to ensure the privacy of students and the work that they do. This being said, the library does have all of these technologies available to students, which would be required for the use of this medium.

Networking: I feel that you can widen networks and include more people by using this medium, as it can be a great source of learning in an online setting. In creating a screencast for a learning purpose, you then can post this to perhaps a blog or video site and open up comments for those who view this. This can be a great way to gain feedback, help others with their learning, and create a network of learning based on the lesson you helped others access. This not only could be accessed by other students but could give inspiration to other instructions for creativity in the making of their lessons. As this is an online medium, you can help mitigate privacy risks by not showing your face within the screencast or opening anonymous comments if individuals do not want their feedback to be shown publicly. You could also manage these risks by only allowing your students to access the screencast, perhaps on a medium like Brightspace or Google Classroom. This can help as students do not have to sign up for a different application and they know their information is more secure through their institution.

Security: As this is a medium that can be used simply personally, or shared online for the use of others, I feel that this medium is secure for students to use. As a student, they have the choice of where to post their screencast, whether that be in a Google Drive to share with a small study group, or to post on a personal blog for others with the link to watch. I feel it is helpful that this medium has the flexibility of what you wish to share with learners, as you have the choice to not show your face and simply narrate the lesson.

Ethical Concerns About the use of AI

Personally, the majority of my ethical concerns with generative AI lie around how it is used in the media and the way that it is rapidly growing. As this is a newer addition to technology, I fear that many people are not properly educated on the use of AI and the implications that it can have on society. While I know that there are many useful and positive aspects of AI, I have also seen many negative uses in the media. For instance, I have seen many images on social media that have been altered using AI, either to create a better image of someone or something or to change one’s perception of a topic, which can often be deceptive in social media. I have also seen many instances where people have altered famous individuals’ voices with AI and created clips that contain false speech, in order to make it seem like the famous individual made a specific claim. Furthermore, I have also heard of many concerns regarding spam calling and the ability for callers to get one short clip of someone’s voice and then create an entire vocabulary that sounds like that individual. Scammers can then use this voice to access individuals’ banking through phone calls and in various other harmful ways. For this reason, many aspects of AI worry me, as it holds the ability for people to take the tool and run away with it in harmful ways, which can often be harmful to people without them even knowing it.

Additional Experimentation with AI

Fig. 1. “A horse being fed an apple by a little girl” prompt, Stable Diffusion, verson 2.1, Stability AI, 24 Mar. 2024, https://stablediffusionweb.com/.
Fig. 2. “A brown horse being bed an apply by a blonde little girl” prompt, Stable Diffusion, version 2.1, Stability AI, 24 Mar. 2024, https://stablediffusionweb.com/.
Fig. 3. “A paint coloured horse being fed an apply by a mother and her kids” prompt, Stable Diffusion, version 2.1, Stability AI, 24 Mar. 2024, https://stablediffusionweb.com/.

I was very interested when experimenting with some of the image AI, as this is something I have never done before. For this reason, I based my prompts off of a simple image, and then changed certain aspects to see how the AI would then alter the photo. I was interested to see that my images seemed to match the prompt for the first two photos, however in the last one perhaps my prompt was a bit too specific, as the image did not come out in the way that I depicted in my prompt.

Works Cited

“Wheel of Fortune – AdmTal” role play game prompt. Perplexity, 21 Mar. version, Open AI, 24 Mar. 2024, https://www.perplexity.ai/.

Module 4: Principles of Learning Design and Active Learning

My Experience: Passive vs. Active Learning

Personally, I have found the balance of passive and active learning in this course to be extremely helpful in being able to apply and generalize the concepts I am learning. In most other courses, I find that most of my learning is done through passive learning, where I am simply learning the foundational knowledge, but then I am expected to find ways to apply it on my own in order to study for assessments such as quizzes and exams. In other courses, I have often found it rare to have many forms of active learning being used. For this reason, I really enjoy how this class has allowed me to learn foundational knowledge through some of the readings and resources, but then there is always an aspect of active learning that allows me to use what I have learned and put it to use in a real-life scenario. I feel that this method of learning has helped me understand how the concepts that I’m being taught are useful, making it more likely that I will use what I have learned outside of school. Even just simply reflecting after learning something new can be a great way to actively learn, as you will only be able to reflect on the things that were truly meaningful to your learning. I have also found that the task of reflecting allows you to understand a topic better and identify how the concept can carry weight in your personal life.

Designing a Lesson Based on Merrill’s Principles

An example that came to mind when learning about Merrill’s principles, specifically the first one on solving real-world problems, was the topic of climate change. Not only is this issue a real-world problem that we are constantly working to combat, but the learning done on this subject is pertinent to many generalizable subjects in school. For instance, for this subject, I would promote learning through a foundation of knowledge, as suggested by Merrill’s second principle. This can be done by teaching the learner about the states of matter, environmental change, ecosystems, and understanding the impacts of greenhouse gases. While these are all topics that are taught in most curriculums, they pertain to an authentic problem and are easily demonstrated and applied by the learner. In applying these topics, I would likely start by demonstrating the main ideas of these topics through teaching and interacting with the science at play, and then have the learner apply the knowledge through an interactive activity. Examples of these could be a drag-and-drop game about the water cycle, or even an image juxtaposition where the students had to identify which image of an environment was before and after climate change. This application of the knowledge learned can then be a great segue into the real-world knowledge that the individual is gaining, as they are seeing how a simple science lesson plays a large role in the environment that they live in.

H5P & Creating Interactive Activities

Upon learning about H5P and designing some activities on my WordPress site, I was a bit confused about how to correctly create them. However, I found that the tutorials for each of the activities were very helpful in learning how to make them. In my current work as an Education Assistant for elementary school students, I feel that in the teaching context, I would mainly be utilizing activities such as quizzes, charts, fill in the blanks, and interactive videos. I found these activities super neat to create, as I realized how many activities would be extremely beneficial for many of the children that I work with. For instance, as I work mainly with neurodiverse children, I would perhaps use the image pairing tool to help a child understand associations of words and pictures. Additionally, I find the ability to make the activities more inclusively accessible is very important, as many learners who are non-verbal use a communication device, thus the ability to add speech is incredibly useful. Creating this activity also gave me a lot of perspective on just how much active learning is present in our daily lives and how easy it can be to incorporate these activities into our learning. Of the activities that I experimented with, I found that the drag-and-drop activity was the most difficult to create, while it only needed a few resources. The process of creating this one was interesting to me as it required you to select all of the fillable spaces first, then create any text that you wanted to add, and then finally label what text matched with each blank space.   

My Lesson Plan

For my lesson plan, I decided to base it on my background of working with elementary schools students and plan a lesson the zones of regulation that are often taught to young children starting out in school. The zones of regulation are used to help kids visual their emotions and feelings and find helpful tools to regulate them in various settings.

Assignment 2: Video for a Learning Purpose

My Video for a Learning Purpose

What is the learning purpose of your video?

The learning purpose of my video was to teach my classmates how to crochet a simple granny square. As I mentioned in the video, crocheting is a hobby that I have picked up, as I found it was a good way to unwind from the stresses of school and life. This video shows you how to start your first simple crochet project and also details how you can grow with crocheting through this initial project.

Why is video a good medium for this learning purpose?

The use of video for a learning purpose can be extremely valuable, as it adds a heightened level of engagement for the learner. Through using a video, learners can listen to the instructions of the video, while also being given a real-time demonstration of what is expected of them. Additionally, videos add a human element to what is being learned, which not only increases engagement with the information but can help to make the lesson more relevant to them. Videos also help learners to see the information, while also hearing it, which allows for them to learn more easily and faster. For instance, when I first learned to crochet, I knew I would have to watch a video, rather than read about a stitch or someone verbally teaching me. This kind of skill is one that you must see in order to understand how to maneuver the yarn and the hook. Thus, I felt that a video was the perfect avenue for this learning purpose, as it has helped me in the past. Another helpful aspect of videos when learning is the fact that you can re-watch, pause, and rewind the video based on your understanding. When learning to crochet, I had to slow down videos and rewatch many clips, as this helped me to gain a better understanding of how to do it. Learning often takes practice, and videos allow learners the flexibility to re-watch and re-learn at their own discretion.

Which of the principles we’ve covered this term (e.g. Mayer/Universal Design for Learning/Cognitive Load Theory) did you incorporate into your design and why?

When planning my video, I wanted to ensure that I was taking Mayer’s Segmenting Principle into account by making my video concise. For this reason, I knew that I was not going to crochet the whole square on video, but rather, I would segment the project into key elements that the audience had to learn and repeat the steps off-camera to create the final piece. I know that I normally get bored when I have to watch a long video, or I will skip the relevant information. Hence, I wanted to make sure that learners were only receiving information that was helpful and concise. Additionally, I knew that I only really needed to show my hands to teach the concepts in this video, however, I took Mayer’s personalization principle into account and wanted to introduce the video and conclude the video with my face, creating a personal aspect to the video. Along the same lines, I also tried to ensure that my voice was in a conversational tone when teaching the steps of the project. Hearing a monotone voice teach you can be very boring, which is why I wanted to create a social aspect to my video, in hopes that it would engage the learner better. As I remembered Mayer’s signalling principle, I made sure that in the clip where I showed the materials, I signalled to which supply I was speaking about, emphasizing each individual tool that was needed to complete this project. As this is a new project, not all learners will know what each tool looks like, which is why I signalled each supply as it was being talked about. While many videos use background music when there is no talking, I steered away from this, as I knew that this could increase cognitive load for learners and I wanted to ensure that they had the capacity to learn the important steps of my project. Finally, in order to make my video more accessible, I made sure to include captions for my videos, ensuring that they lined up with the narration of my actions. To do this, I was able to experiment with an application called VEED.IO, which also doubled as a video streaming site for my video. With a free subscription, this site transcribed my uploaded video and then embedded it with my video. It also gave me the freedom to make changes in the wording of the transcription in case there were any errors, as well as change the font and configuration of the text to ensure it fit well within my video.

What was challenging about capturing your own video?

For me, the most challenging aspect of capturing my video was setting up the camera to only show my hands. As I had to also work under the camera to show what I was doing, this made it very hard to find an area of my house where I could prop up my camera and give a bird’s eye view, while also working beneath it. Luckily, I managed to maneuver the edge of my desk and place my iPad so that only the camera was facing over the edge. From there, I was able to work below and still have the iPad remain stable to capture the view. However, I also struggled with ensuring that the camera could see what I was doing, while also allowing me to view what I was doing. Normally when I crochet, I am in a comfortable position and I can move freely, but I really had to be conscious about where I had to keep my hands for them to be within the frame, as well as facing the yarn and hook upwards, rather than towards myself.

What did you find easiest?

The easiest aspect of creating my video was voicing over the videos of me crocheting. While I was worried about the speed of my work and ensuring that my narration lined up with what I was actually doing, I was pleasantly surprised at how well my script prepared me for the voiceover. I feel that this process was also made easier, as when I was creating my script, I physically started the crocheting process, to ensure that I was explaining step by step what I would be explaining in the video. I then discarded this work, after creating my script, and restarted crocheting, this time while videoing. I feel that it was helpful to almost work backward and then forward again, as simply visualizing the steps would not have created the most accurate instructions for an intricate project like this.

How would you approach capturing video differently next time?

If I had to create this video again, I would likely approach it differently as far as my time management for it. As I showed various steps of my crocheting process, there was time off camera that I would have to continue crocheting, as the steps shown simply had to be repeated. Due to this, there was a large amount of time that I had to devote to simply completing the project, that was not even shown on camera. Thus, I would perhaps plan my time out better to ensure that I would not feel rushed to finish the project in order to shoot the final portions of the video. Furthermore, I would also utilize the tools of other videos in the creation and editing of my video. After uploading my video clips to iMovie, I realized how confusing the navigation of this application can be at times, and I found myself wasting a lot of time trying to figure this out on my own. However, through trial and error, I found that if I am struggling with simple written instructions for these applications, I should look for a video that can help me, as I learned how to fix my problems much faster this way.

Module 3: Storytelling & Creating Video

Meaningful Learning Through Storytelling

In watching a TED Talk by America Ferrera, I was provided with a meaningful learning experience about how individuals all around the world, regardless of their occupation, are impacted by their identity. As America Ferrera is widely known as a famous actress, many do not know the struggles that she faced amid stardom. She starts this talk by detailing her childhood home, as this is where her passion for performing and acting started. She then goes on to explain how from the moment she started acting, no matter how big the role, her identity as a Latina was never enough for the producers or casting agents. They would often ask her to change various aspects of herself to better fit the stereotype that they were trying to portray. In the end, Ferrera explains the strength in her identity and the importance of having the courage to stand against the negative values that are engrained in the workforce.

This story that Ferrera shared was extremely impacting to me, as it not only changed my perspective of who I previously knew as a successful actress, but it allowed me to see that we often only see things for what they are, and the importance of storytelling in shifting our perspectives. In her storytelling Ferrera used her voice to sing when describing her childhood performances, actualizing the story that she was sharing. Additionally, she used imagery to describe the floor tiles of her childhood home, where her passions first came to life. Tapping into these senses within the story allowed me as the watcher to feel a more personal connection to her story and created a deeper meaning as I was able to relive the story through her narration. Thus, I would say that Ferrera definitely used the technique of creating an immersive experience for the watcher. Additionally, she utilized the technique of using a personal story to teach the audience and get her message across. Similarly, her use of imagery and photos aiding the story used the technique of showing, rather than telling. Overall, I felt this story did an amazing job of engaging the audience and leaving a lasting message for them.

Experiences of a Branched Narrative

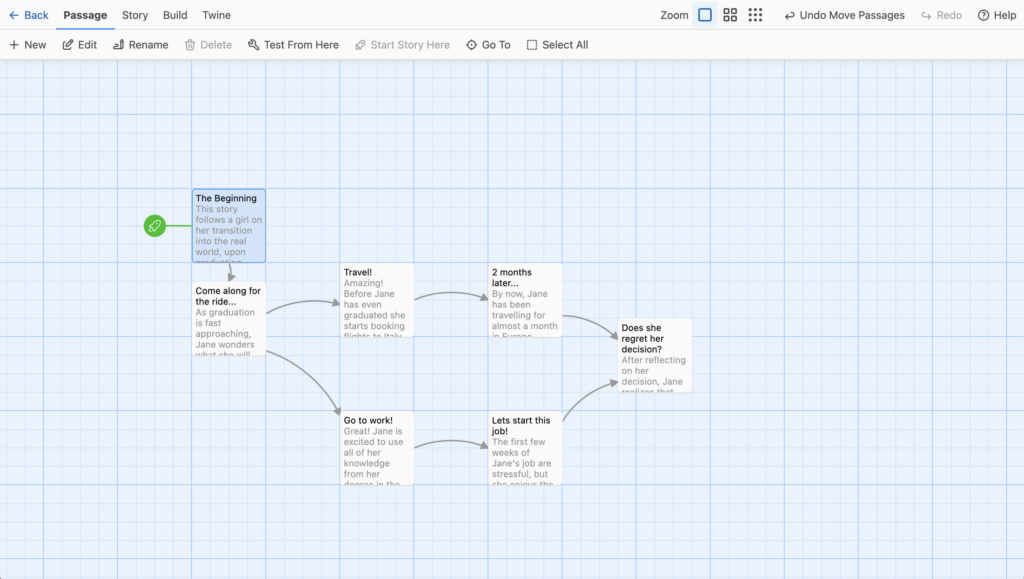
Through the use of a branch narrative, the learner is able to interact directly with the story and circumstances, creating much more engagement and focus on the material. In doing this, learners are likely to retain the information more readily as they are actively contributing to the experience, rather than simply feeling like they are learning. In addition, I feel that branched narratives are able to mirror real-life decision making. In life, we are faced with many choices, and we have to deal with and learn from the choices that we make. Furthermore, we see branched narratives in various other aspects of life such as interactive movies, games, and even flowcharts used to explain various circumstances. Thus, the experience of a branched narrative creates a learning environment that is natural to the reader and allows them to retain information in an unconscious manner.

My Twine Story

In creating my Twine story, I found myself struggling a bit with creativity, but then decided to tell a story that most people have experienced, or will experience within their life. With practice, I feel there are definitely options to make my story more complex, however starting out I tried to keep it simply while I was learning. I tried my best to experiment with some of the options regarding text colour and alignment. While I am not super familiar with coding and it can be confusing for me, I am intrigued to continue to try new things and learn as I go.

Module 2: Design Principles for Effective and Accessible Multimedia

What does inclusive design mean to me?

For me, inclusive design means ensuring that all users can access the content and gain the same information from it, regardless of how they choose to do so. The individual’s abilities, the language they speak, or their prior knowledge should never be something that will hinder them from accessing the content when using inclusive design. In action, inclusive design can look like adding alt text for figure descriptions or providing captions on videos. For instance, by providing captions for videos, those who have challenges with hearing are still able to access the information spoken of. Additionally, some individuals simply learn better through reading, as well as hearing the content within the video. Thus, with inclusive design, all individuals can use the design choices to benefit their learning.

WAVE Accessibility Report:

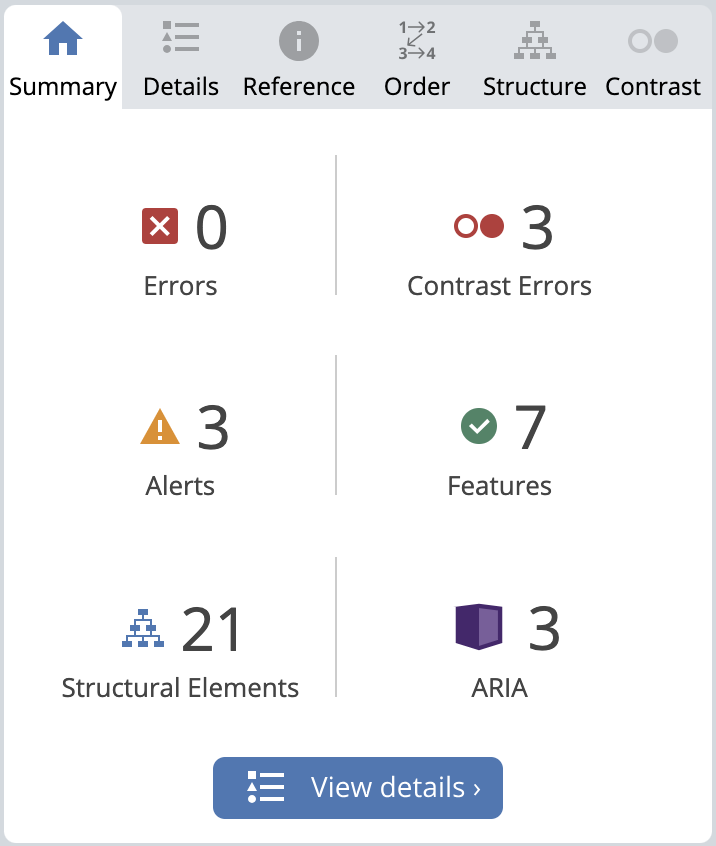
Results from my WAVE Accessibility Report

As represented in the figure above, one of the things that came up in my WAVE accessibility report was the fact that there was low contrast in some of the writing within my post. This was mainly concerning texts such as the date and links within my blog post. For this reason, I am going to try to change the colours of my font, making sure that there is a greater amount of contrast so that all of my users, especially those with poor vision, can view my content with ease. There were also some alerts within my report concerning redundant links, such as the date my blog was posted and the links to my video. This allowed me to understand that redundant information and links can cause repetition for the reader of my blog, and thus contribute to cognitive load, which, as spoken of in Module 1, we want to avoid. Something else that I learned from my WAVE accessibility report is that I had a lot of structural elements within my blog post which helped to provide structure and semantic meaning throughout my post. Moving forward, I will continue to use headings and other structural elements within posts to ensure I can keep up with this. Finally, another large aspect that I learned from the accessibility report is the importance of captions and transcripts for videos. For those who are hearing impaired, captions may be the only way they can understand what is going on within my video content, therefore in the future I will ensure that all video posts will contain synchronized captions.

Text to Speech Tools & Selectable Text:

Text to speech is a tool that I have utilized many times throughout my degree, more commonly when doing readings. When reading, I often find that it is hard for me to stay focused, or I feel as though I am reading without retaining any information. Through using text to speech, I am able to read, as well as listen to the content, which has allowed me to stay more engaged and retain the content easier. Additionally, I have also tried out the various voice options, which I found helped me to stay engaged with the reading, as I was intrigued by many of the voices that had an accent different from my own. However, I would have to say that I likely retained information better when I was listening to someone who had a similar accent to my own, as I was not having to distinguish any differences in word pronunciation. I feel this may be in part due to cognitive load theory, as the different accents may have been contributing to my cognitive load and thus hindering me from retaining as much information.

Additionally, I wanted to add how important the use of selectable text is within accessible learning and inclusive design. Many times, I have wanted to use text to speech to enhance my learning but have been unable to as the text was not selectable. Not only can selectable text allow users to enhance their learning through the use of text to speech, but it can open up more accessibility for users who may need to change the font, size, or colour of text in order to understand and access the content more readily. Hence, I feel it is increasingly important that we ensure selectable text is available when making design choices.

Design Principles of Infographic:

When creating my infographic in Canva, many templates were of interest to me, however, I found that none encompassed all of the principles of design that I wanted to incorporate. For this reason, I decided to take inspiration from the templates I liked and create my own based on the design principles discussed in Module 2. While not using a template took a bit more time, I found that it was easier in the sense that I could create my infographic exactly how I envisioned it, taking the principals into direct account. The principal alignment was important within my infographic, as I made sure that all my text was aligned in the same way, as well as ensuring that the shapes and patterns were all cohesive in alignment. Additionally, balance was another principle that I paid attention to by making alternating sides for my text to be presented. If I kept all of my text boxes on one side of the infographic, it would have caused one side to be very content-heavy and would disrupt the cohesiveness of the graphic as a whole. Negative space is also something that I used in order to incorporate good elements of an infographic. As explained in the Visme video on infographics, a good infographic takes your eyes on a journey. For my infographic, I attempted to do this through my use of negative space. I tried to create a path drawn within my squares of text, in an effort to lead the reader to the next point. Finally, I also considered my use of colour within my infographic. As too many colours can be distracting to the eye, I limited my colour palette to only three colours and used them interchangeably to create contrast and enhance the key elements of the infographic.

Module 1: How do we learn? Theories of Multimedia Learning

For Module 1, I decided to use my screencast to present a tutorial on how to use Goodnotes as an educational tool for learners, as well as teachers. Goodnotes is an app that I use on my iPad but can also be downloaded on other devices. I felt it was important to share this app as I feel it has helped me greatly to employ many of the principles of multimedia learning. Whether you are a student wanting to take notes directly from your professors’ slides, or you are a teacher wanting to record your math problems for students to refer to, Goodnotes is a great tool for education.

Principles in Mind

When creating my screencast, one of the main principles of multimedia learning that I kept in mind was the Coherence principle. It was my priority to keep any extraneous graphics and sounds out of my tutorial, as this can contribute to cognitive overload. I wanted to ensure that my screencast was primarily graphics and narration, as I felt that this would be the best way to understand how to navigate the app. This also ties into the principle of Redundancy, which explains that people learn the most when they are taught through simple graphics and narration. Due to this, I tried to keep minimal text in my tutorial so that everyone could focus more on the graphics and my instructions.

Additionally, Temporal Contiguity was also one of the principles I kept in mind when creating my screencast. This principle explains that students learn best when words and pictures are presented at the same time, rather than one after the other. For this reason, I tried my best to ensure that my narrations matched very closely to the actions I was showing within my screencast, ensuring that it was easy to follow along. Finally, I feel that I kept in mind the Pre-training principle through the use of my tutorial. This principle emphasizes the baseline of knowledge that must be known for students to be able to use an application or learn deeper concepts. It is my hope that my tutorial educated everyone on the basics of Goodnotes, enough that they would be able to navigate it before diving deep into the various ways that they can personalize their learning.

Target Audience

Upon planning my screencast, the main audience that it was directed towards was post-secondary students, as well as post-secondary professors. Not only have I seen this application being used among my classmates, but many of my professors have used it in class, as well as online for recorded lectures. Due to this, my design choices were geared towards navigating the aspects of Goodnotes that would likely be utilized by this audience. For instance, it was important for me to show how to import documents into Goodnotes, as this can be a great way to actively annotate lecture slides while in class. Furthermore, for professors, I highlighted the pointer feature that can be used to highlight what they are speaking on, which is also a great way to address the Signalling principle.